This work is licensed under a Creative Commons Attribution-NonCommercial-NoDerivs 4.0 Unported License.
"Now I can view up to 800 models per minute!"
Hi all, so over the past year or so I’ve been trying to get into HL2 modding. Making the actual mods themselves was not hard and everything was going good until I needed some screenshots, I myself prefer model viewer screenshots as they allow for easier showing of details and such and still allow a good picture of what they look like in game. Beyond the realm of screenshots model viewers are a HUGE help if you need to view a specific model in certain conditions without having to load up the game and then find the said model, a task easier said than done. But there are more often than naught complications in the way.
GoldSrc’s model viewer has been updated throughout the years first through Jed and now through SoloKiller. These updated versions have solved and kept the model viewer up to date throughout the years, the most useful of these working features being the screenshot function as it allows you to take very easy in engine screenshots without loading up the game.
Source however, has not been so lucky. In spite of how popular Source is, people have not given the same love and care to it that GoldSrc got and while Valve HAS updated it throughout the years through various new releases. With support for Source being largely deprecated now the Source version of HLMV has started to become antiquated when compared to its GoldSrc counterpart.
While the various upgrades to GoldSrc’s HLMV have made it very easily accessible and easy to load models, Source’s Hhas various problems with that such as sometimes loading in incorrect models or loading two models at once when that shouldn’t happen. By far the BIGGEST downside to the Source HLMV is the lack of ease of access for the screenshot function, while the current GoldSrc HLMV uses a very easy method of screenshotting by converting to a PNG format. Source’s HLMV on the other hand converts to a TGA format, the problem with this is that this requires the Model Viewer to draw each pixel individually, a process that can take upwards of 2 minutes for one screenshot.
Things were looking grim for me, even pushing me to make a post looking for help. Fortunately, in what can only be seen as insane coincidence or divine intervention, I found HLMV++.
HLMV++ is very easy to use and understand, all of the functions from normal HLMV are included, improved upon, and fixed if broken or bugged before. Most important of these remade functions to me being the remade screenshot function. With Source’s HLMV and even GoldSrc’s HLMV you still had to cut out whatever you were screenshotting by removing the background color, not to mention you still might have to cut out any colored sections not removed by a color select tool. HLMV++ cuts out the middleman and has a transparent screenshot function that completely removes the background.
HLMV SCREENSHOT
HLMV++ TRANSPARENT SCREENSHOT
Below is a list of reasons to use HLMV++
These features alone make it worth using over HLMV. But sadly it isn’t without its problems. That being that it's not really documented how to get it working with other source games outside of L4D2 or TF2. This section will document how to get games like HL2 working with HLMV++
Firstly, go to this page and download HLMV++ from this page. Open the RAR archive. For this method you will need to use the TF2 branch of HLMV++. Extract the TF2 files to the bin folder in TF2’s install folder, more specifically the bin folder inside the folder called “Team Fortress 2” (Just follow the standard install instructions)
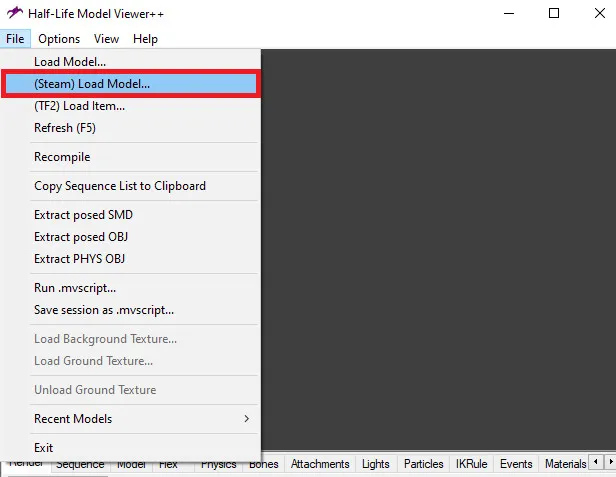
From the HLMV++ you now put in the bin folder you can now load TF2 models AND HL2 models through the load (steam) button. HOWEVER out of the box these are the only models you can view easily through HLMV++. To get access to other models you will need to do some text editing and file moving.
Below are the steps to get other source games working with the HLMV++ TF2 branch.
Firstly, you will need a copy of whatever source games you are trying to view the models of.
Secondly, go to the folder of the game models you are trying to find.
Thirdly, find the files that have the file extension VPK, these are usually named something like “X_pak_XXX.vpk”
Fourthly, take all of these files with the VPK extension and COPY them.
Fifthly, go back to the folder “Team Fortress 2” (TF2’s install folder)
Sixthly, go into the folder named “hl2”, PASTE the files here that were copied from earlier. Now go back to the “Team Fortress 2” folder
Seventhly, go to the folder called “tf”.
Eighthly, open a file called “gameinfo.txt”.
Ninthly, open this file and scroll down until you see THIS
Tenthly, below the line “|all_source_engine_paths|hl2/hl2_misc.vpk’ You need to copy and paste this line “ game+vgui |all_source_engine_paths|hl2/(INSERT GAME NAME HERE)_pak.vpk” (Without quotations, you NEED to include the same amount of spaces as the line above it). Obviously, make sure you input the name of the game you are trying to install, remember that the name of the game is whatever that games folder is named E.G. Half-Life 2: Episode 2 would be ‘’ep2'' since that's the name of its folder.
Finally, save the file and exit. You should now be able to load the models of the game you are trying to view through the “load (Steam)” button in HLMV++.
Optionally, if you are trying to load custom content, go back to the “tf” folder, and then install all of your custom content into the “custom” folder that should already be there (create one if it's not). I should also mention that the custom content will still work in the custom folder even though it's technically meant for TF2.
And that's all she wrote! This guide was a lot of fun to write but keep in mind that this is all based on my knowledge from using HLMV++ and Source so if there is an easier way to view other source games models or there's something I got wrong, please let me know so I can fix it. I need this guide to be as concise and easy to understand so everything being right is critical. That's all folks, we're done here!
Why_You_Should_Use_HLMV++_(And_an_Installation_Guide!).zip

Initiative
None